7. Full Text Search
How should a customer find the product he desires in a more or less unstructured collection of countless products? Hierarchical navigation often doesn’t work and takes too much time. Thanks to the way we use the Internet today, most site visitors expect one central search field inside, or nearby the main navigation bar of a site.
7.1. Search Engine API
While it is possible to adopt other search backends to django-SHOP with little effort, this documentation focuses exclusively on Elasticsearch.
Until version 1.1, django-SHOP used Haystack. Haystack is a great third party app for Django and easy to adapt for full-text search. Unfortunately, Haystack was never adopted to versions of Elasticsearch beyond 1.7. Also, it didn’t allow complicated queries and the configuration is minimal and highly restricted. Therefore, django-SHOP version 1.2 has been refactored to use elasticsearch-dsl together with django-elasticsearch-dsl. It now supports up to the most recent version of Elasticsearch, which currently is 7.6.
In this document we assume that the merchant only wants to index his products, but not any arbitrary content, such as for example the “Terms and Conditions” page, as found outside django-SHOP, but usually inside django-CMS. Indexing CMS pages using Elasticsearch would be perfectly feasible, but is not the topic of this documentation.
7.1.1. Configuration
Download and install the latest version of the Elasticsearch binary. During development, all tests have been performed with version 7.5. After unzipping the file, start Elasticsearch in daemon mode by invoking:
./path/to/elasticsearch-version/bin/elasticsearch -d.
Check if the server answers on HTTP requests. Pointing a browser on http://localhost:9200/ should return something similar to this:
$ curl http://localhost:9200/
{
  "name" : "Ape-X",
  "cluster_name" : "elasticsearch",
  "cluster_uuid" : "P9HVZRPbUXjTEDO9iZHGDk",
  "version" : {
    …
  }
}
Install elasticsearch-dsl and django-elasticsearch-dsl using
pipenv install django-elasticsearch-dsl
In settings.py, add 'django_elasticsearch_dsl' to the list of INSTALLED_APPS.
Configure the connection to the Elasticsearch database:
ELASTICSEARCH_DSL = {
    'default': {
        'hosts': 'localhost:9200',
    },
}
7.2. Indexing the Products
Before adding search support for products on our site, we must consider which fields of our product model contain relevant information to be searched for. The philosophy of django-SHOP is to not impose any predefined fields for this purpose, but rather let the merchants decide what they need. Therefore it is quite important to spot the fields in the product models, which contain the relevant information customers might search for.
Elasticsearch uses the term Document to describe a searchable entity. In django-SHOP, we
can define one or more product models, each declaring their own fields. Since in our e-commerce
site, we want to search over all products, regardless of their specific model definition, we need a
mapping from those fields onto the representation used to create the reverse index. For this
purpose, django-SHOP is shipped with a generic document class named ProductDocument. It
contains three index fields: product_name, product_code and body.
7.2.1. Product Name
The product’s name often is declared as a CharField in our product’s model. Depending on the
nature of the product, it could also be declared for different languages. Using django-parler’s
TranslatableField, the product name then is stored in a Django model related to the product
model. We also want to ensure, that this name is indexed only for a specific language.
This information is stored inside the Document field: product_name.
7.2.2. Product Code
The product’s code is the unique identifier of a product and is independant of the language. However, in case a product is offerend in different variants, each of them may declare their own product code. This means, that the same product can be found through one or more product codes. Moreover, since product code are unique identifiers, we usually do not want to apply stemming.
They are stored as a list of keywords inside an Elasticsearch Document entity.
7.2.3. Body Field
Depending on our product’s model declaration, we can have many additional fields containing information, which may be relevant for search. Therefore the merchant must declare a Django template for each product type. This template then is used to render the content of those fields as plain text. This text is never seen by humans, but rather is used to feed our full text search engine when building the reverse index. First Elasticsearch strips all HTML tags from that text. In the second step, this text is tokenized and stemmed by Elasticsearch analyzers. In django-SHOP we shall specify one analyzer for each natural language.
7.2.3.1. Example
Say, we have a product using this simplified model representation:
from django.db import models
from shop.models.product import BaseProduct

class Author(models.Model):
    name = models.CharField(
        "Author Name",
        max_length=255,
    )

class Editor(models.Model):
    name = models.CharField(
        "Editor",
        max_length=255,
    )

class Book(BaseProduct):
    product_name = models.CharField(
        "Book Title",
        max_length=255,
    )

    product_code = models.CharField(
        "Product code",
        max_length=255,
    )

    caption = HTMLField(
        help_text="Short description",
    )

    authors = models.ManyToManyField(Author)

    editor = models.ForeignKey(
        Editor,
        on_delete=models.CASCADE,
    )
By default, django-SHOP’s search functionality indexes only the fields product_name and
product_code. Usually we also want other fields beeing indexed, if they contain relevant
information. If say, the merchant’s implementation is named awesome_bookstore, then inside the
project’s template folder, we must create a file named awesome_bookstore/search/indexes/book.txt.
This template file then shall contain a structure similar to this:
{{ product.caption }}
{% for author in product.authors.all %}
{{ author.name }}{% endfor %}
{{ product.editor.name }}
When building the index, this template is rendered for each product offered by our bookstore.
The rendered content is passed directly to the search engine and serves to feed the Elasticsearch
database with a reverse index. Before importing, it is cleaned up, removing all HTML tags.
Afterwards it is tokenized into a list of separate words. These words then are stemmed, which
means that they are reduced to their basic meaning. The final step is to remove common words, such
as “or”, “the”, “is”, “and” etc. This list of words is named “The Reverse Index” and is then stored
in the body field inside entities of type shop.search.documents.ProductDocument.
Note
If the above template file can not be found, django-SHOP falls back onto
awesome_bookstore/search/indexes/product.txt. If that template file is missing too, then
the file shop/search/indexes/product.txt is used. Note that the template file always is in
lowercase.
7.2.4. Populate the Database
To build the index in Elasticsearch, invoke ./manage.py search_index --rebuild. If German and
English are configured, then the output may look like:
$ ./manage.py search_index --rebuild
Deleting index 'awesome_bookstore.de.products'
Deleting index 'awesome_bookstore.en.products'
Creating index 'awesome_bookstore.de.products'
Creating index 'awesome_bookstore.en.products'
Indexing 986 'Product' objects
Indexing 986 'Product' objects
Depending on the number of products in the database, this may take some time. Note, that only products tagged as “active” are indexed. To check, if the product can be found in the index, point a browser onto:
http://localhost:9200/awesome_bookstore.en.products/_search?q=django&pretty.
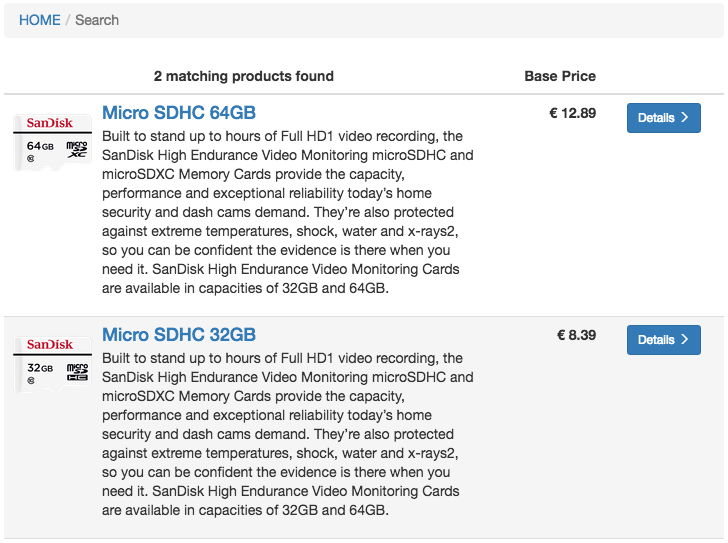
If our awesome bookstore offers books whose title or caption text contains the word “Django”, then these books are listed as “hits” in the JSON response from Elasticsearch.
7.3. Search View
In order to show search results, we need a database filled with a reverse index. This is what we have done in the previous section. This populated search database can be used for two kind of purposes:
Generic search over all products and as an additional “search-as-you-type” filter, while rendering the catalog’s list view.
7.3.1. Search Apphook
As with all other pages in django-SHOP, the page displaying our search results is a normal CMS page too. It is suggested to create this page on the root level of the page tree. As title for this page we choose “Search Results” or something similar meaningful. Since we want to hide this page from the menu navigation, we must disable its Menu visibility using the appropriate checkbox in the CMS page tree admin.
We now change into the Advanced Setting of the page. There we set the page ID to
“shop-search-product”. This identifier is required, so that the search functionality knows where
to render the search results. As Application, we select Catalog Search from the drop-down
menu. This selects the django-CMS apphook provided by django-SHOP for its catalog search.
Note
The apphook Catalog Search must be registered by the merchant implementation. It’s just as
simple as registering shop.cms_apphooks.CatalogSearchApp using the
menus.menu_pool.menu_pool.apphook_pool.register().
As a template use one with a placeholder large enough to render the search results. The default template shipped with django-SHOP usually is a good fit.
Now save the page and change into Structure mode. There locate the placeholder named Main Content and add a Bootstrap Container plugin, followed by a Row and then a Column plugin. As leaf child of that column, choose the Search Results plugin from section Shop. This CMS plugin offers three pagination options:
- Manual Paginator: If searching generates too many results, add a paginator on the bottom of the page. The customer may scroll through those pages manually.
- Manual Infinite: If searching generates too many results, add a button on the bottom of the page. The customer load more results clicking on that button.
- Auto Infinite: If searching generates too many results, and the customer scrolls to the bottom of the page, more results are loaded automatically.
As with all other placeholders in django-CMS, you may add as many plugins together with the Search Results plugin.
Finally publish the page and enter some text into the search field. This should render a list of found products.
7.3.1.1. Adopting the Templates
Search results are displayed using a wrapper template responsible for rendering a list of found
items. The default template can be found in shop/templates/shop/search/results.html. It can
be replaced or extended by a customized template in the merchant implementation, namely
app_label/templates/app_label/search/results.html [1]. In our bookstore
example this template would be named
awesome_bookstore/templates/awesome_bookstore/search/results.html.
Since each of the found items may be from a different product type, we can provide a snippet template for each of them. This allows us to display the given list in a polymorphic way, so that each product type can provide its own way how to be rendered. That snippet template is looked up following these rules:
app_label/templates/app_label/products/search-product-model-name-media.html[1], [2]app_label/templates/app_label/products/search-product-media.html[1]shop/templates/shop/products/search-product-media.html
This means that the template to render the products’s detail view is selected automatically depending on its product type.
| [1] | (1, 2, 3) app_label is the app label of the project in lowercase. |
| [2] | product-model-name is the class name of the product model in lowercase. |
7.3.2. Autocompletion in Catalog List View
As we have seen in the previous example, the Product Search View is suitable to search for any item in the product database. Sometimes the site visitor might just refine the list of items shown in the catalog’s list view. Here, loading a new page which uses a layout able to render every kind of product usually differs from the catalog’s list layout, and hence may by inappropriate.
Instead, when someone enters some text into the search field, django-SHOP starts to narrow down the list of items in the default catalog’s list view by typing query terms into the search field. This is specially useful in situations where hundreds of products are displayed together on the same page and the customer want to pick out the correct one by entering some search terms.
To extend the existing Catalog List View for autocompletion, locate the file cms_apps.py in
the merchant implementation. There we add a special search filter to our existing product list view.
This could be implemented as:
from cms.apphook_pool import apphook_pool
from shop.cms_apphooks import CatalogListCMSApp
from shop.rest.filters import CMSPagesFilterBackend

class CatalogListApp(CatalogListCMSApp):
    def get_urls(self, page=None, language=None, **kwargs):
        from shop.search.mixins import ProductSearchViewMixin
        from shop.views.catalog import AddToCartView, ProductListView, ProductRetrieveView

        bases = (ProductSearchViewMixin, ProductListView)
        ProductSearchListView = type('SearchView', bases, {})
        filter_backends = [CMSPagesFilterBackend]
        filter_backends.extend(api_settings.DEFAULT_FILTER_BACKENDS)
        return [
            url(r'^(?P<slug>[\w-]+)/add-to-cart', AddToCartView.as_view()),
            url(r'^(?P<slug>[\w-]+)', ProductRetrieveView.as_view()),
            url(r'^', ProductSearchListView.as_view(
                filter_backends=filter_backends,
            )),
        ]

apphook_pool.register(CatalogListApp)
In this apphook, we create the class ProductSearchListView on the fly. It actually just adds
the mixin shop.search.mixins.ProductSearchViewMixin to the existing
Catalog List View. This class extends the internal filters by one, which also consults
the Elasticsearch database if we filter the product against a given query request.
7.4. The Client Side
To facilitate the placement of the search input field, django-SHOP ships with the reusable
AngularJS directive named shopProductSearch. It is declared inside the module
shop/js/search-form.js.
A HTML snipped with a submission form using this directive can be found in the shop’s templates
folder at shop/navbar/search-form.html. If you override it, make sure that the <form...>
tag uses the directive shop-product-search as attribute:
<form shop-product-search method="get" action="/url-of-page-rendering-the-search-results">
  <input name="q" ng-model="searchQuery" ng-change="autocomplete()" type="text" />
</form>
If you don’t use the prepared HTML snippet, assure that the module is initialized while bootstrapping our Angular application:
angular.module('myShop', [..., 'django.shop.search', ...]);